Frequently Asked Questions
Pathfinder
- Do I need to take more than one reading to get percent of shading?
- Does it matter what time of day I make the tracing?
- Does it matter where I stand when I take the photo?
- How can I calculate for shading for a future roof-top site?
- How do I adjust for magnetic declination?
Q. Do I need to take more than one reading to get percent of shading?
A. If the analysis is for a smaller array, one reading may be sufficient. If you are doing analysis for rebates, you need to contact your local agency to find out their requirements. Some require only one reading, some require readings at the bottom two corners of the array, some require readings taken at all the major corners. The Solar Pathfinder Assistant software automatically averages multiple analyses.
Q. Does it matter what time of day I make the tracing?
A. The Solar Pathfinder is designed to give a full year’s worth of solar radiation data in an instant. It does not matter what time of day or day of year you take your analysis. It is easier to take the reading on somewhat cloudy or overcast days to avoid the sun’s glare.
Q. Does it matter where I stand when I take the photo?
A. Yes, stand directly over the center of the dome with the camera within 12-18 inches of the top. The photo should show an even amount of the blue rim around the dome section.
Q. How can I calculate for shading for a future roof-top site?
A. The most accurate analysis will always be taken at the height and location of the array. When accessibility is not an option, you can manually calculate solar access. Because distance to each shading object makes a difference, the calculations can be somewhat time-consuming. Instructions, diagrams, and a free downloadable spreadsheet are available on the Formulas page of our site. We are hoping to include this feature in our software sometime in the future.
Q. How do I adjust for magnetic declination?
A. Gently pull out the brass Magnetic Declination Tab located by the compass 1/4". This will allow the center triangle and black disk to easily pivot. The “number line” on the perimeter of the diagram is for magnetic declination adjustment. The numbers to the left of “0” are “west of north” or negative numbers. The numbers to the right of “0” are “east of north” or positive numbers.
- Rotate the sunpath diagram on the central pivot counterclockwise for declinations to east of north (positive numbers). This would be for the western continental US as well as other places around the world.
- Rotate the sunpath diagram on the central pivot clockwise for declinations to west of north (negative numbers). This would be for the eastern continental US as well as other places around the world.
After you have correctly adjusted for magnetic declination, gently push the brass Magnetic Declination Tab back in toward the compass. This “locks” the diagram into place. The “noon” hour has now been adjusted to face “true south”.
For a definition of magnetic declination, more detailed instructions and maps concerning magnetic declination, see the manual or the Magnetic Declination page on our site.
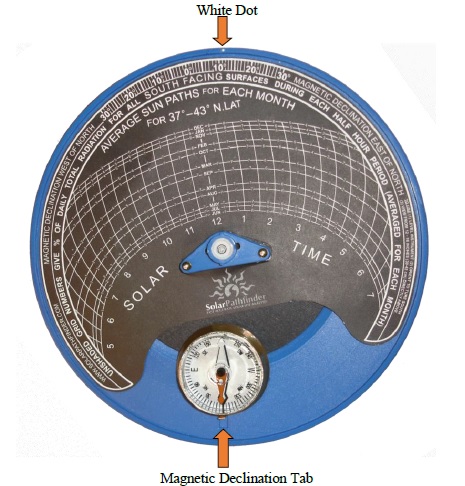
This picture shows the PF with magnetic declination set at +11 degrees. This would be correct for some parts of the western continental US.
About Us
 We are proud of the fact that our product was and still is a US product. Read our all-American story


